Nail Interlock Tips for Perfect Connections and Secure Fastening?
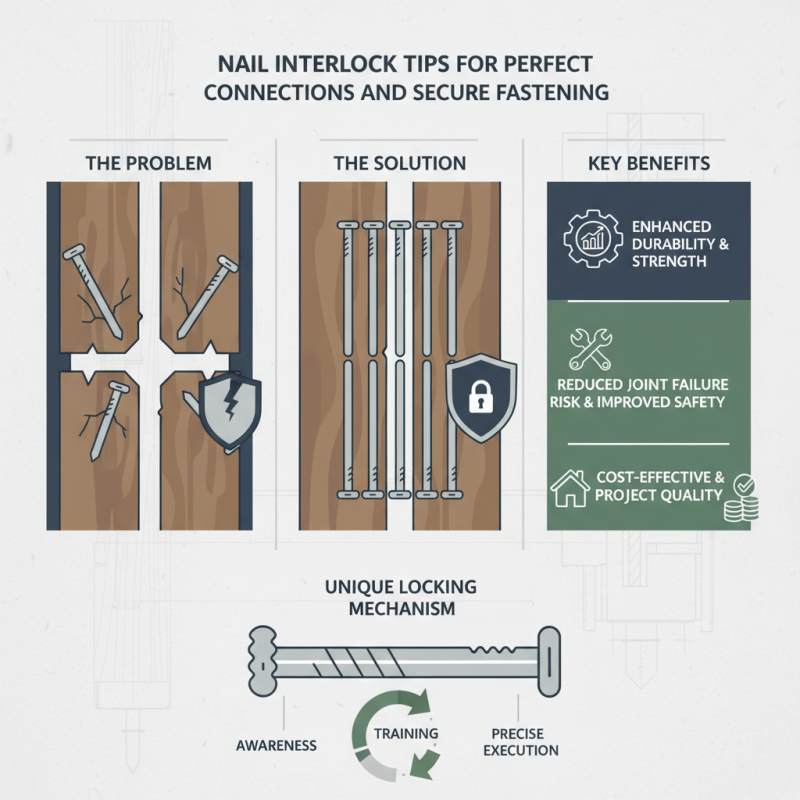
In the construction and woodworking industries, reliable fastening methods are crucial. Nail interlock systems have gained attention for their ability to provide strong connections. According to the National Association of Home Builders, proper fastening accounts for 30% of structural integrity in residential buildings. Nail interlock, with its unique locking mechanism, enhances durability and reduces the risk of joint failure.
However, the implementation of the nail interlock technique is not without challenges. Many craftsmen overlook proper alignment during the fastening process. Misalignment can weaken the joint, ultimately compromising structural safety. An industry report from the American Wood Council highlights that incorrect fastening is responsible for up to 15% of structural failures. Awareness and training are essential to mastering nail interlock methods.
While nail interlock serves as a reliable fastening technique, it requires careful execution. The decision to use this method should not be taken lightly. Errors in judgment can lead to costly repairs or unsafe structures. Ultimately, understanding the intricate details of nail interlock will improve fastening reliability and enhance overall project quality.
Understanding Nail Interlock Mechanisms and Their Benefits
Nail interlock mechanisms play a crucial role in ensuring strong and secure connections. These systems use interlocking features to create mechanical bonds. When properly engaged, they resist pull-through forces and enhance joint stability. Home improvement projects often benefit from these mechanisms, particularly in wood framing and furniture assembly.
When using nail interlocks, precision is key. Misalignment can lead to weak joints. It's vital to assess the fit before fastening. Sometimes, a slight adjustment leads to a more secure connection. Remember, not all materials work well with interlock systems. The right pairing can maximize grip and durability.
Practicing with various materials can improve your technique. Observing how different nails perform helps in future projects. Sometimes mistakes occur, like overdriving the nails, which compromises their hold. Learning from these experiences is essential for mastering nail interlock systems. Understanding their benefits will lead to better results in your projects.
Nail Interlock Tips for Perfect Connections and Secure Fastening
| Tip | Description | Benefits | Best Use Cases |
| Choose the Right Nail Type | Use nails that are specifically designed for interlocking mechanisms. | Improves overall strength and reliability of the connection. | Furniture assembly, cabinetry. |
| Pre-drill Holes | Pre-drilling reduces splitting of the material when inserting nails. | Ensures cleaner connections and protects materials. | Woodworking, delicate materials. |
| Use a Nail Gun | A nail gun can provide consistent depth and placement. | Increases efficiency and reduces labor time. | Large projects, rapid assembly. |
| Test Connections | Always test connections before finalizing the assembly. | Ensures stability and avoids future issues. | Final assembly checks, quality control. |
| Keep Nails Clean | Remove any debris or dirt from nails before use. | Improves adhesion and interlock effectiveness. | All assembly tasks. |
Materials Used in Nail Interlock Construction for Enhanced Durability
In the realm of construction, selecting suitable materials for nail interlock systems is crucial for ensuring durability and strength. Reports indicate that steel nails outperform aluminum ones in terms of shear strength by over 30%. This is vital when dealing with heavy loads. Using premium-grade materials guarantees that the connection maintains integrity over time.
When considering nail interlock construction, the type of wood also matters. Hardwoods like oak and maple offer denser structures, providing a sturdier base compared to softer woods. This choice can reduce the chances of splitting or loosening over years.
Tips for achieving the best results include: Pre-drill holes to prevent wood splitting. Choose the correct length and diameter of nails to ensure a solid connection. Regularly inspect connections for signs of wear. Over time, it’s essential to reflect on these choices. Sometimes, even minor material discrepancies can lead to significant failures in structural integrity.
Nail Interlock Material Durability Comparison
Step-by-Step Guide to Achieving Perfect Nail Interlock Connections
Achieving perfect nail interlock connections requires precision and attention. Start by selecting the right nails; different projects may demand varied types. Use nails that fit well together for a secure hold. Lay them out before starting. This helps visualize the final outcome.
Next, apply even pressure as you connect the nails. If you rush, gaps may form, leading to weak connections. Don’t hesitate to pull apart and adjust if something feels off. It’s better to take time for adjustments than to face issues later. Strive for an even, consistent finish.
Sometimes, mistakes happen. A nail may slip out of alignment, or the spacing could be uneven. These imperfections can be frustrating but are opportunities for learning. Analyze what went wrong. Adjust your techniques for the next attempt. With practice, your connections will improve, leading to stronger and more secure fastening.
Common Mistakes to Avoid When Using Nail Interlock Techniques
When using nail interlock techniques, avoiding common mistakes is crucial for strong connections. One mistake is not cleaning the surfaces properly before fastening. Dust or debris can weaken the bond. A clean surface ensures better adhesion and stability.
Another common error is positioning the nails incorrectly. Misalignment can lead to weak joints. Ensure nails are aligned straight. This enhances the strength of the connection. Always double-check your alignment before driving in the nails.
One tip is to use an appropriate nail length. Too short, and the connection can fail easily. Too long, and it may split the material. Testing different lengths on scrap pieces helps you find the ideal size. It's a simple but effective way to avoid frustration. Consistent practice and attention to detail will lead to improved results over time.
Maintenance Tips for Ensuring Long-Lasting Nail Interlock Joints
Proper maintenance of nail interlock joints is crucial for ensuring their longevity. Regular inspections should be conducted to check for any signs of wear or damage. Look for gaps in the joints or loose nails. These small issues can lead to bigger problems if neglected. Tightening loose connections can often help maintain structural integrity.
Cleaning the joints is also important. Dust and debris can accumulate, affecting the fit of the nails. A simple brush or cloth can do wonders. Ensure the surfaces are free of any contaminants before reassembling. However, overzealous cleaning may damage delicate parts. Striking a balance is key.
Humidity and temperature changes can affect the joints too. Wood expands and contracts, which may displace nails. Regularly adjusting your setup based on environmental changes will prolong the life of your joints. Sometimes, a simple adjustment can prevent significant issues. Being proactive, rather than reactive, is essential. Don't underestimate the small details; they can save time and money in the long run.